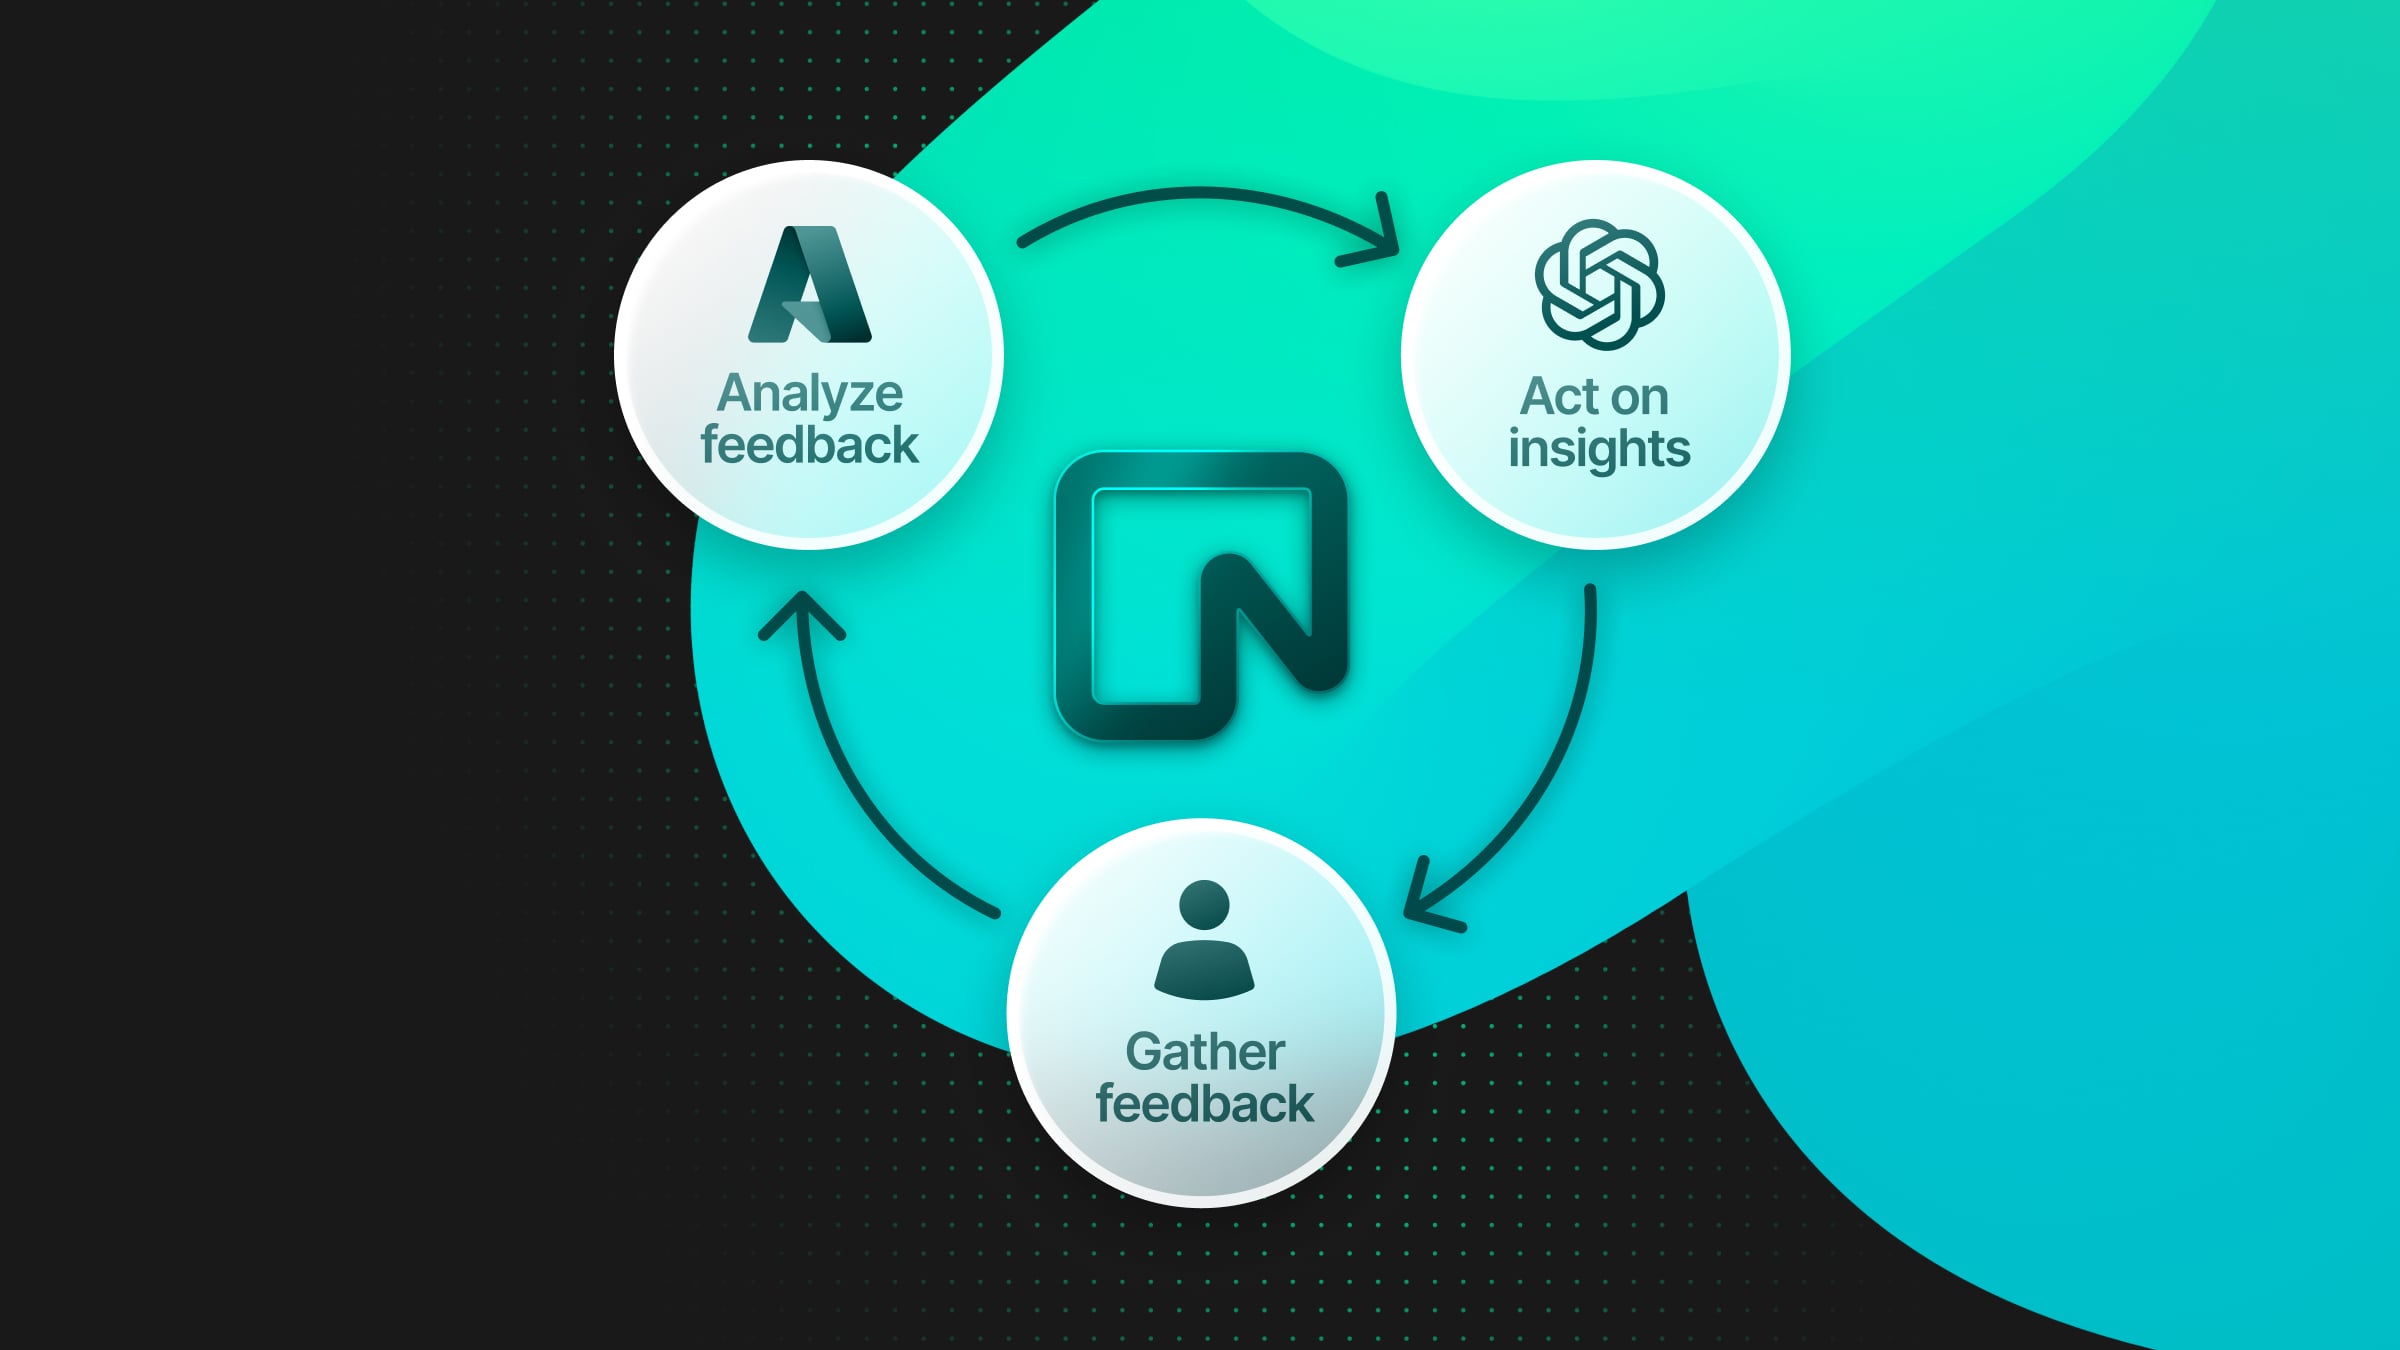
As vector search and Retrieval Augmented Generation(RAG) become mainstream for Generative AI (GenAI) use cases, we’re looking ahead to what’s next. GenAI primarily operates in a one-way direction, generating content based on input data. Generative Feedback Loops (GFL) are focused on optimizing and improving the AI’s outputs over time through a cycle of feedback and learnings based on the production data. In GFL, results generated from Large Language Models (LLMs) like GPT are vectorized, indexed, and saved back into vector storage for better-filtered semantic search operations. This creates a dynamic cycle that adapts LLMs to new and continuously changing data, and user needs. GFL offers personalized, up-to-date summaries and suggestions.
A good example of a GFL in action is personalized recommendations, targeted ads, or identifying trends, where an AI might suggest products to a user based on their browsing history, clicks, or purchases. In this article, we’ll break down how this works and how a feedback loop improves the model outputs over time. Our sample solution will suggest podcasts to users based on their listening history.
You can also quickly jump on the source code hosted on our GitHub and try it yourself.
Data flow in the Generative Feedback Loops
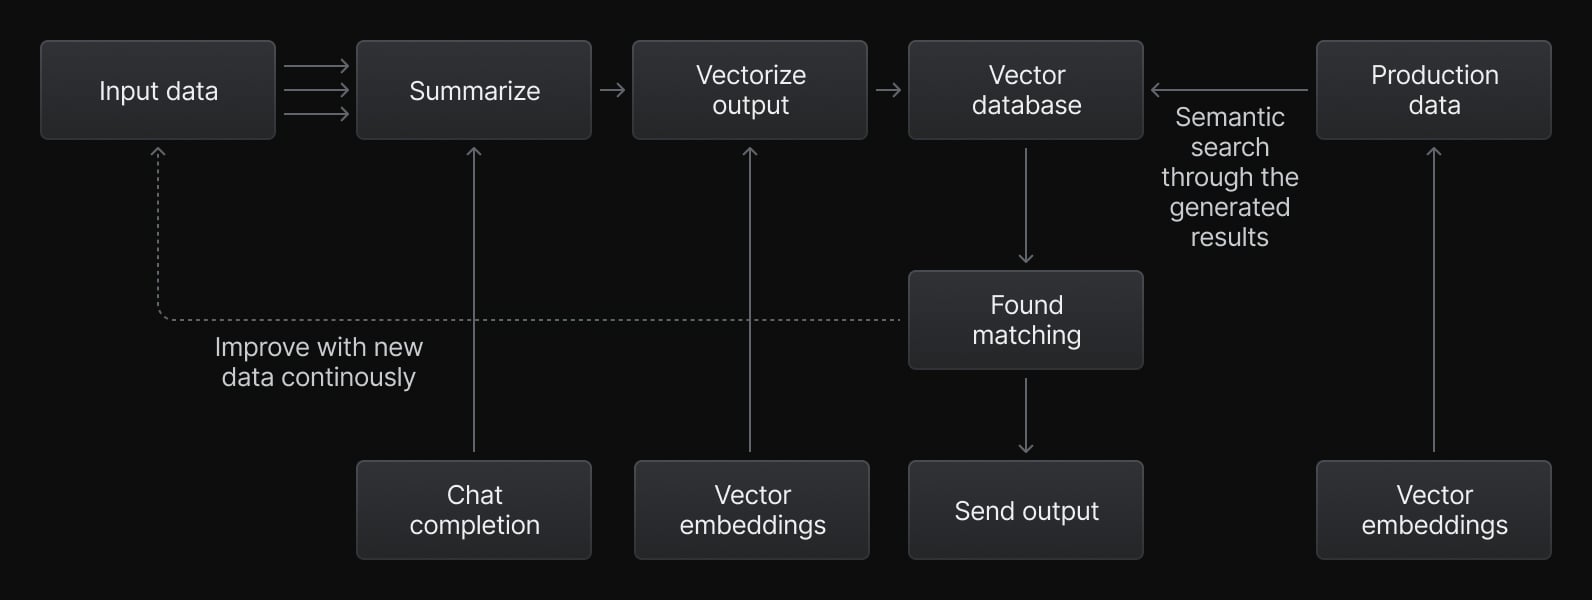
Use Case: Podcast Recommendations Based on Listening History
We will create feedback loops for podcast recommendations that learn user profiles and find out what they love to listen to. To develop this project we:
- Expose APIs using Azure Serverless Functions in Python to handle real-time requests, like adding new podcasts, generating recommendations, and updating user preferences.
- Store all podcasts and user data in the Neon database, including transcripts with vector representations and user listening histories.
- Retrieve a user’s listening history and generate vector embeddings for it using Azure OpenAI service.
- Compare these embeddings with the embeddings of available podcasts in the Neon database using the
pgvectorextension. Relevant podcast episodes are retrieved dynamically based on similarity scores. - Generate personalized podcast suggestions using Azure OpenAI and save these suggestions back into the Neon database for future interactions.
- When new podcasts are added or user preferences change over time, GFL provides more accurate suggestions.
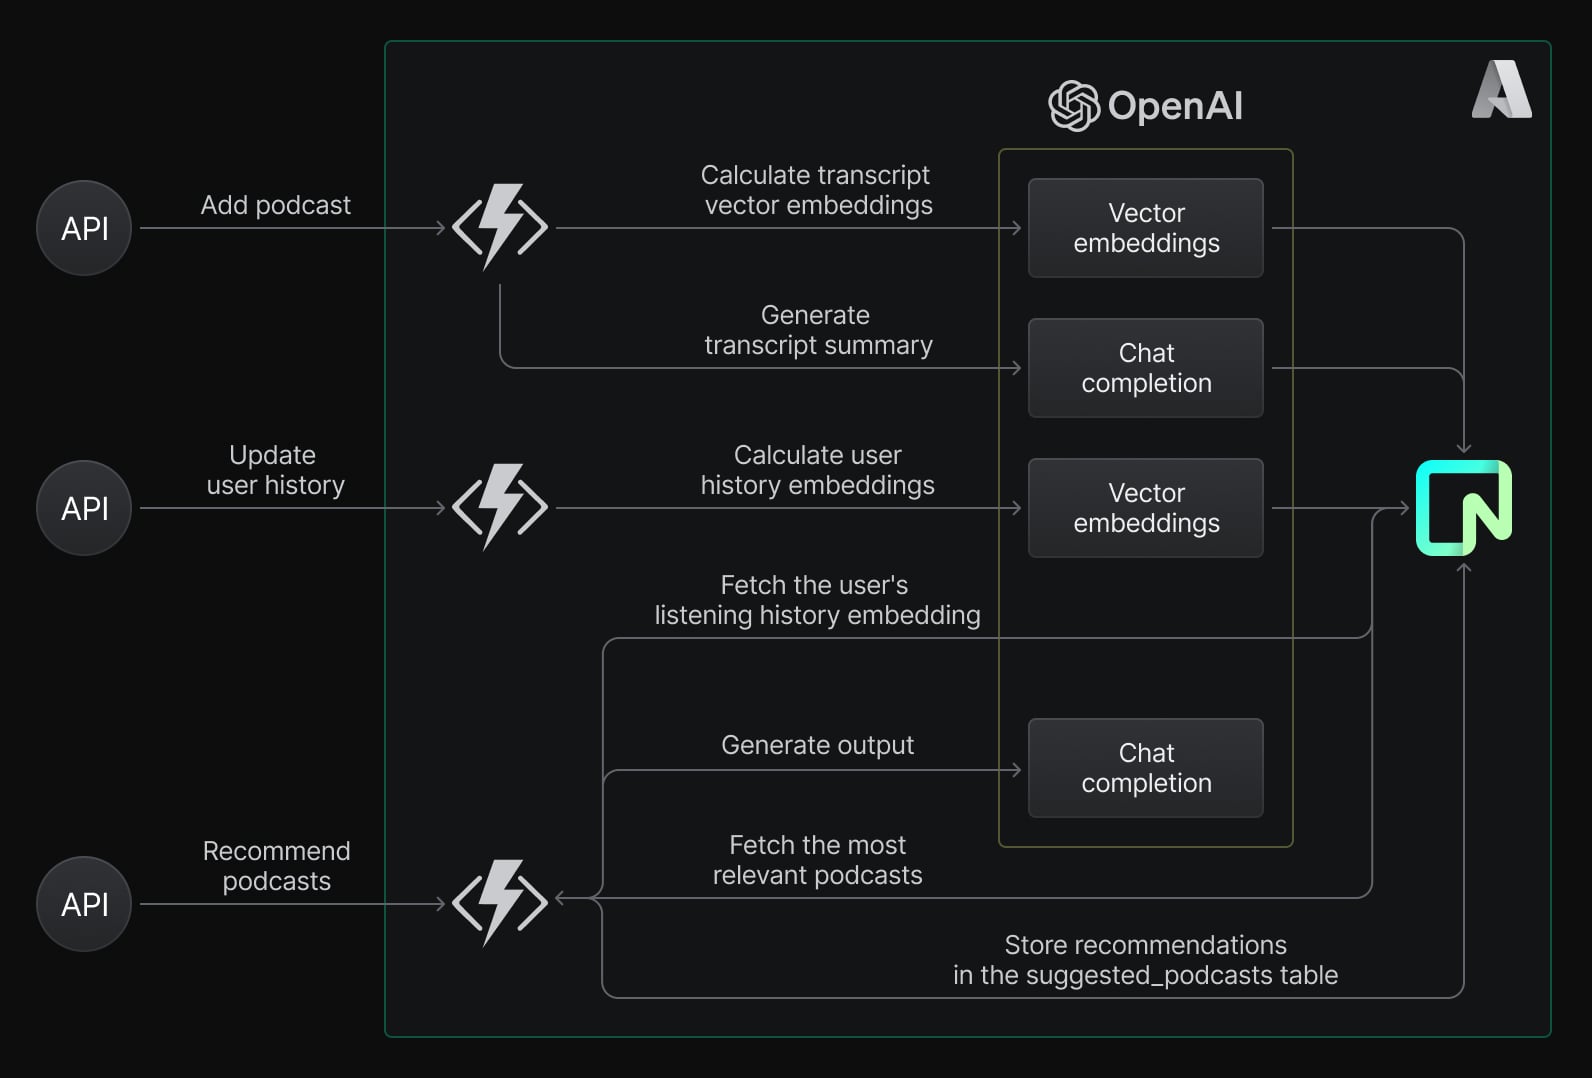
How GFL helps in this use case
The feedback loop has benefits to make the suggestions more realistic:
- Dynamic: Adapts to new data (e.g., podcasts, user preferences) in real-time.
- Personalized: Continuously updates based on user interactions, ensuring recommendations remain relevant.
- Scalable: As more users and podcasts are added, the loop ensures the model improves its output without manual intervention.
Example: Personalized Podcast Suggestion
Input:
- User Listening History: “Podcasts about AI, deep learning, and data science trends.”
- Relevant Podcasts:
- “The AI Revolution”: “Exploring recent AI advancements.”
- “Data Science Today”: “Trends and techniques in data science.”
- “Deep Learning Unplugged”: “Understanding neural networks.”
Setting Up the Neon Project
Prerequisites
Before we begin, make sure you have the following:
- Python 3.8 or later version
- Azure Functions Core Tools installed
- A free Neon account
- An Azure account with an active subscription
- Visual Studio Code on one of the supported platforms.
- The Python extension for Visual Studio Code.
- The Azure Functions extension for Visual Studio Code, version 1.8.1 or later.
Create a Neon Project
- Navigate to the Neon Console
- Click “New Project”
- Select Azure as your cloud provider
- Choose East US 2 as your region
- Give your project a name (e.g., “generative-feedback-loop”)
- Click “Create Project”
- Once the project is created successfully, copy the Neon connection string. You can find the connection details in the Connection Details widget on the Neon Dashboard.
Set Up Database Tables
Open the SQL editor in Neon and execute the following script to set up the schema:
-- Create a table to store vector embeddings
CREATE EXTENSION IF NOT EXISTS vector;

CREATE TABLE podcast_episodes (
    id SERIAL PRIMARY KEY,
    title TEXT NOT NULL,
    description TEXT,
    transcript TEXT NOT NULL,
    embedding VECTOR(1536)
);

CREATE TABLE users (
    id SERIAL PRIMARY KEY,
    name TEXT NOT NULL,
    listening_history TEXT,
    embedding VECTOR(1536)
);

CREATE TABLE suggested_podcasts (
    id SERIAL PRIMARY KEY,
    user_id INT NOT NULL,
    podcast_id INT NOT NULL,
    suggested_at TIMESTAMP DEFAULT CURRENT_TIMESTAMP,
    similarity_score FLOAT,
    FOREIGN KEY (user_id) REFERENCES users (id) ON DELETE CASCADE,
    FOREIGN KEY (podcast_id) REFERENCES podcast_episodes (id) ON DELETE CASCADE
);
Insert Sample Data
Add sample users:
INSERT INTO users (name, listening_history)
VALUES
('Alice', 'Interested in AI, deep learning, and neural networks.'),
('Bob', 'Enjoys podcasts about robotics, automation, and machine learning.'),
('Charlie', 'Fascinated by space exploration, astronomy, and astrophysics.'),
('Diana', 'Prefers topics on fitness, nutrition, and mental health.'),
('Eve', 'Likes discussions on blockchain, cryptocurrency, and decentralized finance.'),
('Frank', 'Follows podcasts about history, culture, and ancient civilizations.');
Setting Up Azure AI Service to Use Models
Let’s set up Azure AI Service and deploy two models: GPT-4 to summarize a podcast transcript and text-embedding-ada-002 to convert a text string (e.g., podcast transcript or user history) into a vector embedding.
Create an Azure OpenAI Resource
Before deploying models, you need an Azure OpenAI resource. Follow these steps:
- Go to the Azure Portal:
- Sign in with your Azure account.
- Create a New OpenAI Resource:
- Click Create a resource and search for Azure OpenAI.
- Click Create to start setting up the resource.
- Fill in the Required Fields:
- Subscription: Select your Azure subscription.
- Resource Group: Choose an existing group or create a new one to organize your resources.
- Region: Pick a region where Azure OpenAI is supported.
- Name: Provide a unique name for your resource (e.g.,
MyOpenAIResource).
- Review and Create:
- Click Next until you reach the “Review + Create” tab.
- Review the settings and click Create.
Deploy the Models
Once your Azure OpenAI resource is created, you can deploy the models:
Deploy GPT-4o (For Chat and Query Understanding)
- Go to your Azure OpenAI resource in the Azure Portal.
- Click on the Model catalog tab.
- Find the gpt-4o model in the list.
- Click Deploy and follow the prompts:
- Provide a name for the deployment (e.g.,
gpt4o). - Keep the default settings or adjust based on your needs.
- Provide a name for the deployment (e.g.,
- Wait for the deployment to complete. Once ready, Azure will provide:
- Endpoint URL: The URL to send API requests.
- API Key: The key to authenticate API calls.
Deploy text-embedding-ada-002 (For Embeddings)
- While in the same Model catalog, find the text-embedding-ada-002 model.
- Click Deploy and provide a deployment name (e.g.,
text-embedding-ada-002). - Follow the same steps as above and wait for deployment.
Use the Models
To connect the Python Azure Functions application to these models, we will use the Endpoint URL and API Key together with model names from your Azure OpenAI resource.
Set Up Azure Functions Project in Python
We use Visual Studio Code to create a Python function that responds to HTTP requests. You can also initiate a function using pure CLI, but VS code makes it easy with built-in commands to generate automatically an Azure Functions project with an HTTP trigger template.
- Create a new folder and name it:
generative-feedback-loop - Open the folder in VS code.
- In VS Code, press F1 to open the command palette and search for and run the command
Azure Functions: Create New Project.... - Follow the Microsoft docs “Create a local function project” template to provide the information at the prompts.
- This will initiate a new function project in Python.
Project Structure
The final project structure looks like this:
generative-feedback-loops-example/
├── .env                    # Environment variables (Neon connection string, Azure OpenAI keys, etc.)
├── requirements.txt        # Python dependencies
├── host.json
├── local.settings.json
├── function_app.py         # Single file with all Azure Function definitions
├── utils/
│   ├── database.py         # Database utilities for Neon
│   ├── openai_client.py    # Azure OpenAI client utility
│   └── config.py           # Configuration management
├── data/
│   └── sample_data.sql     # Sample SQL data for podcasts and users
Set Up Environment Variables
Create a .env file in your Python project directory:
DATABASE_URL=your-neon-database-connection-string
OPENAI_ENDPOINT=https://your-openai-resource.openai.azure.com/
OPENAI_API_KEY=your-azure-openai-key
EMBEDDING_MODEL=text-embedding-ada-002
GPT_MODEL=gpt-4
Add Python Dependencies
Lists Python dependencies in requirements.txt file:
azure-functions==1.21.3
psycopg2-binary==2.9.10
openai==1.59.3
python-dotenv==1.0.1
Install dependencies
pip install -r requirements.txtCreate a main Function App
Create or update function_app.py that contains Azure Function implementations. It has three functions APIs for the feedback loop process:
- Adds New Podcasts:
POST /add_podcast- When new episodes are added, embeddings and summaries are generated and stored in the Neon database.This provides a semantic understanding of each podcast episode.
- Updates User Preferences:
POST /update_user_history- Updates user listening history and vector representations.
- Retrieves Dynamic Recommendations:
GET /recommend_podcasts?user_id=<user_id>- Fetches relevant podcasts based on real-time comparisons of user embeddings with podcast embeddings (using vector similarity) to provide personalized suggestions.
import azure.functions as func
import logging
from utils.database import execute_query
from utils.openai_client import generate_embeddings, generate_summary

app = func.FunctionApp(http_auth_level=func.AuthLevel.ANONYMOUS)

# Add Podcast API
@app.route(route="add_podcast")
def add_podcast(req: func.HttpRequest) -> func.HttpResponse:
    try:
        # Extract data from request
        data = req.get_json()
        title = data.get("title")
        transcript = data.get("transcript")

        if not title or not transcript:
            return func.HttpResponse(
                "Missing 'title' or 'transcript' in the request body.", status_code=400
            )

        # Generate embedding and summary
        embedding = generate_embeddings(transcript)
        prompt = f"Summarize the following podcast transcript:\\n{transcript}\\nSummary:"
        summary = generate_summary(prompt)

        # Insert into the database
        execute_query(
            "INSERT INTO podcast_episodes (title, transcript, embedding, description) VALUES (%s, %s, %s, %s);",
            [title, transcript, embedding, summary],
        )

        return func.HttpResponse(
            f"Podcast '{title}' added successfully.", status_code=201
        )
    except Exception as e:
        logging.error(f"Error in add_podcast: {e}")
        return func.HttpResponse("Failed to add podcast.", status_code=500)

# Update User Listening History API
@app.route(route="update_user_history")
def update_user_history(req: func.HttpRequest) -> func.HttpResponse:
    try:
        # Extract data from request
        data = req.get_json()
        user_id = data.get("user_id")
        listening_history = data.get("listening_history")

        if not user_id or not listening_history:
            return func.HttpResponse(
                "Missing 'user_id' or 'listening_history' in the request body.",
                status_code=400,
            )

        # Generate new embedding for the listening history
        embedding = generate_embeddings(listening_history)

        # Update user history and embedding in the database
        execute_query(
            "UPDATE users SET listening_history = %s, embedding = %s WHERE id = %s;",
            [listening_history, embedding, user_id],
        )

        return func.HttpResponse(
            f"Listening history for user {user_id} updated successfully.",
            status_code=200,
        )
    except Exception as e:
        logging.error(f"Error in update_user_history: {e}")
        return func.HttpResponse(
            "Failed to update user listening history.", status_code=500
        )

# Recommend Podcasts API
@app.route(route="recommend_podcasts")
def recommend_podcasts(req: func.HttpRequest) -> func.HttpResponse:
    try:
        user_id = req.params.get("user_id")
        if not user_id:
            return func.HttpResponse(
                "Missing 'user_id' in query parameters.", status_code=400
            )

        # Fetch the user's embedding from the database
        user = execute_query("SELECT embedding FROM users WHERE id = %s;", [user_id])
        if not user or not user[0][0]:
            return func.HttpResponse(
                f"No embedding found for user ID {user_id}.", status_code=404
            )

        user_embedding = user[0][0]

        # Query for the most relevant podcasts
        query = """
            SELECT id, title, description, embedding <-> %s AS similarity
            FROM podcast_episodes
            WHERE embedding IS NOT NULL
            ORDER BY similarity ASC
            LIMIT 5;
        """
        recommendations = execute_query(query, [user_embedding])

        # Store recommendations in the suggested_podcasts table with GPT-generated short descriptions
        response = []
        for rec in recommendations:
            podcast_id = rec[0]
            title = rec[1]
            description = rec[2]
            similarity = rec[3]

            # Call GPT to generate a short description
            prompt = f"Summarize the following podcast in 5 words or less:\\n\\nPodcast: {title}\\nDescription: {description}\\n\\nSummary:"
            short_description = generate_summary(prompt)

            # Save the recommendation with the GPT-generated description
            execute_query(
                """
                INSERT INTO suggested_podcasts (user_id, podcast_id, similarity_score)
                VALUES (%s, %s, %s);
                """,
                [user_id, podcast_id, similarity],
            )

            response.append(
                {
                    "id": podcast_id,
                    "title": title,
                    "description": short_description,
                    "similarity": similarity,
                }
            )

        return func.HttpResponse(str(response), status_code=200)
    except Exception as e:
        logging.error(f"Error in recommend_podcasts: {e}")
        return func.HttpResponse("Failed to fetch recommendations.", status_code=500)
To make the recommendations more appealing, Azure OpenAI generates a short summary for each episode in recommend_podcasts function. For example, a long description will become:
Summary: “Explore the latest trends in AI and how it’s shaping our future.”
In the same function, we are updating suggested_podcasts table each time when a suggestion is generated from the model. This data can be used to analyze past suggestions to avoid redundant recommendations. It also gives more analytics information to measure the performance of recommendations (e.g., average similarity score, engagement rate)
Create a Database Utils
Handles Neon database connections and queries:
from psycopg2 import pool
from utils.config import DATABASE_URL

connection_pool = pool.SimpleConnectionPool(1, 10, DATABASE_URL)

def execute_query(query, params=None):
    conn = connection_pool.getconn()
    try:
        with conn.cursor() as cur:
            cur.execute(query, params)
            if query.strip().lower().startswith("select"):
                return cur.fetchall()
            conn.commit()
    finally:
        connection_pool.putconn(conn)
Create an OpenAI Client
Handles embedding and summarization requests to Azure OpenAI.
from openai import AzureOpenAI
from utils.config import OPENAI_ENDPOINT, OPENAI_API_KEY, EMBEDDING_MODEL, GPT_MODEL

openai_client = AzureOpenAI(
    azure_endpoint=OPENAI_ENDPOINT,
    api_key=OPENAI_API_KEY,
    api_version="2024-02-01",
)

def generate_embeddings(text):
    response = openai_client.embeddings.create(input=text, model=EMBEDDING_MODEL)
    embeddings = response.data[0].embedding
    return embeddings

def generate_summary(prompt):
    response = openai_client.chat.completions.create(
        model=GPT_MODEL,
        messages=[
            {"role": "user", "content": prompt},
        ],
    )
    return response.choices[0].message.content
Create Config File
Manages application configuration:
import os
from dotenv import load_dotenv

load_dotenv()

DATABASE_URL = os.getenv("DATABASE_URL")
OPENAI_ENDPOINT = os.getenv("OPENAI_ENDPOINT")
OPENAI_API_KEY = os.getenv("OPENAI_API_KEY")
EMBEDDING_MODEL = os.getenv("EMBEDDING_MODEL")
GPT_MODEL = os.getenv("GPT_MODEL")
Run the Project Locally
Run the Azure Functions locally
To start the function locally, press F5 in the VS code. Your app starts in the Terminal panel. You can see the URL endpoints of your HTTP-triggered functions running locally.
[2025-01-05T14:42:41.977Z] Worker process started and initialized.

Functions:

        add_podcast:  <http://localhost:7071/api/add_podcast>

        recommend_podcasts:  <http://localhost:7071/api/recommend_podcasts>

        update_user_history:  <http://localhost:7071/api/update_user_history>
Test APIs
Add the podcast to the Neon database:
curl -X POST "<http://localhost:7071/api/add_podcast>" \\ -H "Content-Type: application/json" \\ -d '{ "title": "Future of Robotics", "transcript": "This episode discusses the advancements in robotics and how automation is transforming industries worldwide. We explore the latest innovations in robotic technologies, including machine learning and AI integration, enabling robots to perform complex tasks with precision. Additionally, we discuss the ethical implications and challenges of widespread automation, such as its impact on the workforce and society at large." }'Update the user’s listening history:
curl -X POST "<http://localhost:7071/api/update_user_history>" \\ -H "Content-Type: application/json" \\ -d '{"user_id": 1, "listening_history": "Interested in robotics and AI."}'Get Recommend Podcasts:
curl -X GET "<http://localhost:7071/api/recommend_podcasts?user_id=1>"Next Steps
- Deploy to Azure using by following this guide.
- Integrate APIs with a frontend for a complete user experience.
- This example can be further improved by analyzing semantic similarity across episodes and identifying trending topics.
Conclusion
In our podcast recommendation example, GFL is involved in understanding user preferences through their listening history. GLF helped to find relevant episodes by comparing user interests with podcast data in real time. It also improved recommendations by updating the Neon database with new podcasts and preferences.
Additional Resources
- Connect a Python application to Neon using Psycopg
- Optimize pgvector search
- Building AI-Powered Chatbots with Azure AI Studio and Neon
- AI app architecture: vector database per tenant demo
Try it
You can check out our GitHub repository, and give us any feedback on our Discord server!
Neon is a serverless Postgres platform that helps teams ship faster via instant provisioning, autoscaling, and database branching. We have a Free Plan – you can get started without a credit card.
